There’s a simple pleasure that comes from eating something homemade. Whether it’s the time it takes to construct it, or the amount of love we put into a dish, food made from scratch tends to feed the soul as well as the body. I’ve always been comfortable experimenting in the kitchen, but never had the guts to try my hand at fermentation. The chance that something could go wrong, that I could completely screw it up or even—*gasp*—hypothetically poison myself was just too great, or so I thought.
So when a friend suggested we attend the San Diego Fermentation Festival, I jumped at the chance to explore my inner hippy and perhaps even learn something in the process. As soon as we arrived, a wash of colors, smells, acids, brines, family recipes, and generational knowledge met us at the gate. At the kimchi booth we learned about clay pots and buried cabbage, we came to our centers in the yoga tent, and tasted a kaleidoscope of new flavors. Pickled eggs, anyone? It was amazing to find that the culture of fermentation is alive and well, and surprisingly coming back into renewed favor.
As research into the science of gut bacteria grows, there is mounting evidence that our microbiome plays a bigger role in shaping the body’s systems than previously thought. According to UC San Diego gut health researcher Rob Knight, a presenter at the festival, our body’s microbiome is linked to shaping our brain function, development, immunity, obesity, athletic ability, and personality, among other factors. We are made of water and bacteria, a whole organism comprised of tiny living things. As practitioners of yoga, we understand this connection to life and the energy that unites us all. By making and consuming fermented foods, we not only help ourselves, but assist in maintaining the internal balance we have in all things, our tiny bugs.
It’s important to understand the difference between pickling and fermenting. Some pickles are fermented, but not all ferments are pickled. In general, pickling is a term that refers to the action of preserving food in an acidic medium. In most cases that medium is vinegar. Fermentation, on the other hand, is a preservation method that relies on bacteria to create the acidic medium. Lactobacilli, a “good” kind of bacteria, are naturally found in the human body and often used in fermented foods. When you give lactobacilli an ideal environment to grow, they convert the starches and sugars in food into lactic acid. The lactic acid production is what gives fermented foods their unique sour smell and flavor. The fermentation process is also what makes them such nutritious super foods that are teeming with life.
So be bold, try a recipe, and please, don’t be intimidated by the seemingly long instructions. When you break it down, fermentation is basically a repetition of the same five steps: clean, chop, pack, brine, and wait. Believe me, once those little pickles are staring at you from the countertop, the hardest part is waiting through the few days that separate you from the perfect pickle.
Simple Easy Sauerkraut
With its stinky reputation and usually lackluster flavor, sauerkraut gets a pretty bad rap. But as one of the easiest ferments out there, it’s a great place for beginners to start and worlds better than the jarred sludge you might find hidden in the back of grandma’s pantry. Try it on sandwiches, savory stews, or as an acidic pop on your next probiotic powered quinoa bowl.
INGREDIENTS
1 medium head of green cabbage
1 1/2 tbsp kosher salt
1 tbsp caraway or dill seeds (optional)
Supplies:
Large mixing bowl
1 large 2-quart, or 2 small 1-quart canning jars
Small cloth or a coffee filter for covering the lid
Small jam jar that will fit inside the mason jar
Small weights (rocks, marbles, pie weights) for weighting the jam jar
Twine, kitchen string, or a rubber band
DIRECTIONS
To start, make sure everything is exceptionally clean. Wash your jars, utensils, surfaces, and hands with hot or warm soapy water, making sure to remove any leftover soap residue. When you’re culturing bacteria you want to give the good bugs every effort to grow, while keeping the nasties out.
Discard the outer leaves of your cabbage, slice into quarters and remove the core. It’s the hard stumpy part at the bottom of the head. Slice your quarters into 1/4-inch wide ribbons, chopping until your desired size is reached.
Transfer cabbage to a large mixing bowl and sprinkle with salt. Massage the cabbage for about 5 to 10 minutes until watery and limp; just like you would for a kale salad. Toss in any added spices now. Take your massaged cabbage and pack it into your sterilized jars, pressing down on the mix as you go and adding in any juice that may have escaped during the mashing process.
Once packed, take your little weighted jam jar and place it on top of the cabbage. This helps to keep the cabbage submerged as it ferments and releases more liquid. Cover the mouth of your vessel(s) with a coffee filter or cloth and secure with twine or a rubber band then set in a cool place away from direct sunlight. Over the next day, tend to your ’kraut by pressing down on the jelly jar and squishing the cabbage. Oddly satisfying, no?
Most likely, it will start to smell a little bit funky. This is perfect! It means your lactobacilli are hard at work. If after a day your cabbage still hasn’t released enough liquid to become completely submerged, dissolve 1 tsp salt in 1 cup water and add to the jar(s). It’s normal for the water to get a little cloudy.
Start tasting around day 3. When it’s reached your desired level of funkiness, remove the jam jar weight and transfer the whole thing to the fridge. The cold will slow or stop the fermentation process and as long as the cabbage stays under the water, finished sauerkraut is good for 2–3 months.
The best way to tell if it’s still good is by using your nose. It should smelly tangy, sulfuric, and briny. Any ammonia or overly yeasty smells indicate it may have gone off, as do spots of black or pink mold. Keep the cabbage submerged in the brine and you’ll have delicious sauerkraut for weeks to come.
Easy Home Made Yogurt Without a Maker
So you want to make your own yogurt. Awesome! With a few simple steps, you can have your own fresh batch in less than 24 hours without the need of a dehydrated or prepackaged starter. Once you get the hang of the process it’s easy to make the jump to creating non-dairy milks, cheeses and greek yogurt.
INGREDIENTS
1/2 gallon whole or 2% milk (Avoid “ultra-pasteurized” if possible, as this will sometimes inhibit bacteria growth, regular pasteurized is fine)
1/2 cup of your favorite plain and unsweetened commercial yogurt containing live active cultures
Supplies:
Heavy saucepan for heating the milk
1 large 2-quart, or 2 small 1-quart canning jars
Thermometer
Small bowl
Whisk
Dishtowel
DIRECTIONS
Pour the milk into your saucepan and gently heat it until it reaches 200 degrees F, slowly stirring to prevent scorching. Keep the milk at this temp for about 10 minutes. This denatures the natural milk proteins and keeps the finished yogurt smooth.
After 10 minutes, allow the milk to cool until it reaches 110–115 degrees F, stirring occasionally to prevent a skin from forming. Place the saucepan in an ice water bath if you want to speed up the process.
Remove 1 cup of the cooled milk and whisk in commercial yogurt until smooth. Add back to the milk mixture and stir. Pour the yogurt mix into your clean jars and wrap with a dishtowel. Place in a warm spot and leave undisturbed for at least 4 hours. I usually leave mine overnight on the counter in the summer, or in a turned off oven in the winter.
Once you see the yogurt has set to a custard-like consistency, place your jars in the fridge to cool. You’ve done it! Note that homemade yogurt is usually thinner than store bought due to the absence of stabilizers. When you want to make a new batch, take 1/2 a cup of your homemade and use it to seed the new milk with bacteria. As long as your yogurt still tastes good, you can continue to breed new batches from your original. If it starts to get stringy or odd tasting, start your next batch with a cup of commercial again.
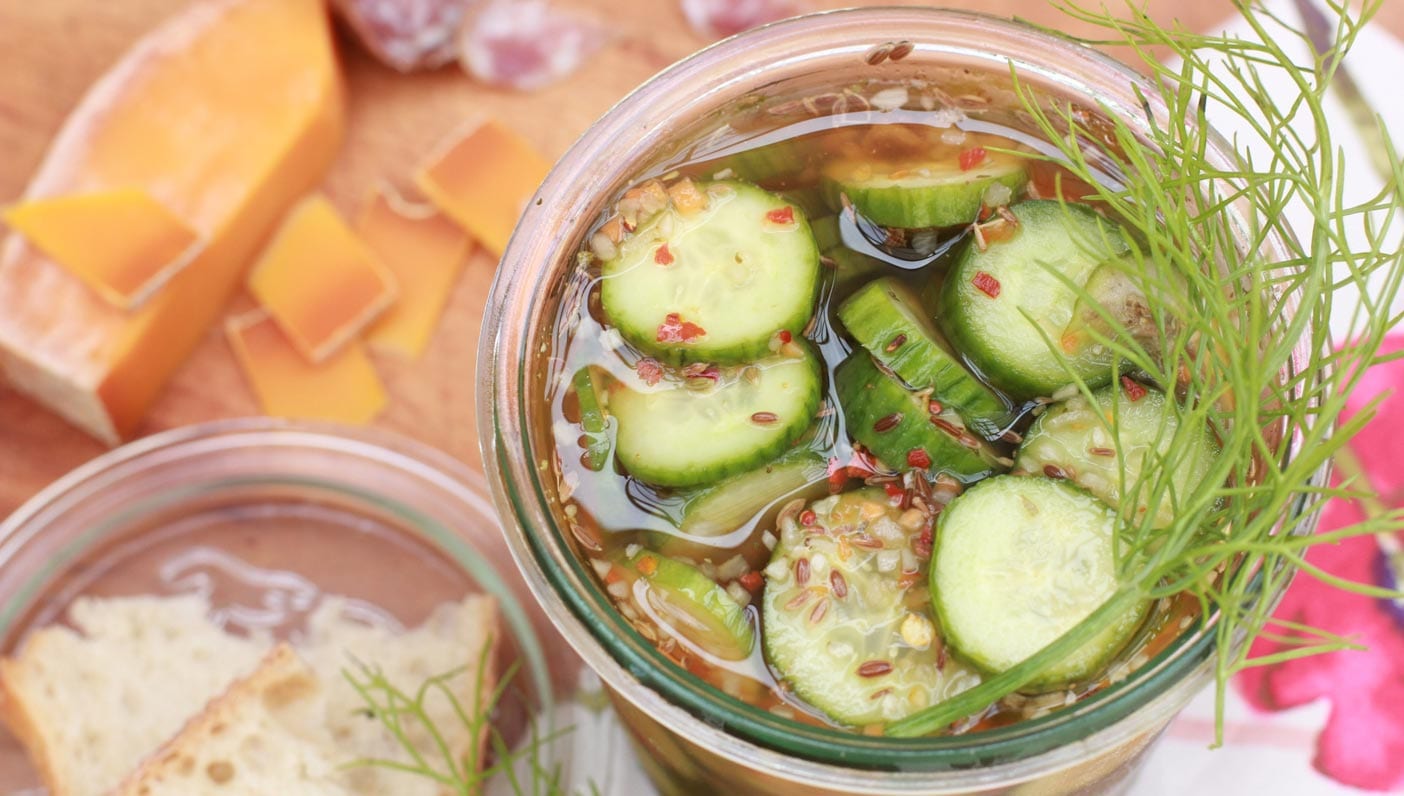
Lacto Fermented Vegetables
OK, OK. On to the pickles.
INGREDIENTS
3 tbsp sea salt, pickling salt, or kosher salt (see note)
1 quart water (see note)
1 cup small cucumber spears (English or Persian varieties work well)
1 cup carrot slices
1 cup red bell pepper slices
2 cloves garlic, smashed and peeled
1 bay leaf
1/2 tsp coriander seeds
1/2 tsp mustard seeds
1/2 tsp dill seeds
1/4 tsp black peppercorns
1 jalapeno or 1/4 tsp chili flakes (if you want your pickles spicy, otherwise feel free to omit)
Once again, wash and sanitize all your jars, utensils, surfaces, and hands with hot or warm soapy water, making sure to remove any leftover soap residue. Combine salt and water in a small bowl and stir until the salt is dissolved. It’s not necessary, but you can also heat the water to make the salt dissolve more easily. If you do, let the water cool back to room temp before mixing with the veggies.
Pack the veggies and remaining spices into a very clean, large vessel. I’ve found a half-gallon mason jar works very well. Pour the salty water over the veggies, leaving one inch of headspace between the lid and the top of the liquid. You want your vegetables to stay submerged under the brine to discourage mold growth.
Cover the jar tightly and let it stand at room temperature. About once a day, open the jar to taste the pickles and release gases produced during fermentation. You might hear a slight pop as you open the lid, as these pickles are a live food! If any mold or scum has formed on the top, skim it off.
When your pickles are sour enough for your liking, anywhere from 1–5 days, place the sealed jar in the refrigerator. The cold will slow the fermentation process almost to a halt. Feel free to enjoy your new pickles for up to a month or longer, as they get more flavorful every day.
Recipe Notes
Salt: It’s best to use salt that is free of iodine and/or anti-caking agents, which can inhibit fermentation.
Water: Whenever possible, use spring, distilled, or filtered water. Tap water often contains chlorine, which can also inhibit naturally occurring fermentation
Want to tell someone about fermentation? Check out this Wanderlust Postcard video with Summer Bock.
—
 Nicole Gurney is a freelance writer living and working in San Diego. She focuses on healthy living, recipe development and exploring the role mindfulness plays in leading a balanced life. Sea salt and chocolate are her weaknesses, as is the promise of a good time. Eclectic and creative, she seeks new opportunities to grow her talents as a young professional, while remaining calm and level in an ever more demanding world.